Personally, I investigated how to set up Keycloak and make it possible to use Windows Hello to authenticate using a passkey.
Mind that to simplify things, I just created a realm where only this kind of authentication is supported.
Flows
Copy “browser flow”
Remove OTP, password field
Add webauthn passwordless
Copy “registration flow”
Only “Registration user Profile Creation” is needed.
Policies
Webauthn passwordless
Failed to register your Passkey. invalid cert path
Solution: In my case, it was because I had set Attestation conveyance preference to Direct. Leaving it to Not specified made everything work like a charm.
Another suggestion on the Internet is to try out enabling different signature algorithms, such as RS256 for Yubikey.
Note: Originally written on the 13th of March, 2024. It has been updated to reflect some changes. Consider that features may have changed in the meantime. For instance, Dexxter now does have OCR, supports PEPPOL, and can read your bank account. Dexxter has been acquired by a bigger company, giving them more resources.
Since this article was written, Dexxter actually did implement OCR, for instance.
As a one man business, a side business actually, I had difficulties managing the complexity of an accountant in Belgium.
While originally my profits were small and I was looking to cut down on costs, I realized I did need assistance with over-complicated finance stuff. Doing international business, both in Europe and other regions, makes it more complicated too. And I learned there are for example different ways to write things off (1st of January vs. actual purchase date) in my case; and even the online tools I evaluated do it (by default) opposite from each other.
But even finding an accountant who was willing to take me on as a customer, proved to be a challenge. Out of all the ones I contacted, I got to visit one – as a courtesy since I went to school with the guy.
I initially meant to investigate the two main (promoted) ones: Accountable and Dexxter. While doing a typical web search, I was presented with a comparison matrix by a third player, CoManage. It wasn’t entirely accurate though; it listed API as a feature for Accountable.
I spend around an equal time playing around with Accountable and Dexxter. I may have missed some features.
There are actually two things which I had in mind as a “MUST”.
API. I want to be able to integrate my existing applications (which include contact data) and just synchronize this info with the accountancy tool. Spoiler alert: both solutions failed.
Export of all data. I want to be able to make an offline backup of my data at any given time. Too many applications have changed over time, or have been discontinued, or prices went way up. I want to have the freedom to leave, with all my data, at any given point.
Features
Accountable
Pro:
When importing invoices (from third parties), there is an OCR feature which tries to prefill as much as possible. Seems to be quite capable, real time-saver!
A great feature I didn’t consider: bank integration. They can show an overview of the transactions, and they can then be linked to invoices.
Very good wizards and pro-active suggestions.
Integration with Mollie.
Nice timeline and reports.
Large knowledge base.
Cons:
No API ( Note: in the comparison matrix by CoManage, it seems it was incorrectly stated there was one ).
Investments: linear write off by default (so set on 1st of January, which is allowed for my VAT status, and may be beneficial at some point but it’s not what I’m looking to do).
Unknown:
They’re starting to experiment with AI. Seems to be a chatbot based on their KBs.
Not enough time to play around with PEPPOL, seemed to be supported.
User base: Unknown. On Google, they have a 4.7 score based on 34 reviews.
Dexxter
Sign up here now! No additional cost for you; but – full disclosure – I get a small cut .
Pro:
Some limited multi-lingual support to create quotes and invoices. Templates are a bit limited though.
You can maintain a list of your own products.
Integration with Mollie.
Link your bank account.
PEPPOL support.
Feels very snappy.
Very good wizards and pro-active suggestions.
Investments: pro rata write off by default (so from purchase date onwards).
Nice timeline and reports.
Quite a few exports; but the main one to export all your input is missing documents you upload (e.g. PDF invoices) and only contained CSV files …
Small community.
Large knowledge base. Also, the KB is nicely integrated and seems to suggest actually relevant FAQs on each section.
Ability to enter the expected frequency of certain costs (+ alerts about invoices which may be missing)
Only lets you go back 1 year since the time of creating your profile. So, if you’re in 2024, you can’t add invoices to year 2022.
Cons:
There was no easy way to retrieve any uploaded documents.
API has been requested at least since 2021, but is not available.
User base: Their website currently states 10,000+ (which is a growing number the last couple of years). On Google, it scores 4.9 out of 210 reviews. Surprisingly enough, the lowest rating is 4/5.
CoManage
I honestly gave up shortly after signing in. There was a very short welcome video. I played around with the layout, and it was way too busy for me. This did not give me a feel of simplicity – the key thing I’m looking for.
Pricing
Accountable comes in 3 flavors: free (very limited), small and pro. I check nearly all of the boxes of “small”, but I need an IC-listing (with my Europese customers). That’s a “pro” feature. Pay per month, or per year (cheaper).
Dexxter also seems to have different packages (VAT status), but the price seems to be the same for all. Hint: On their own website, they host pages with some partner info. For many of those partners, promo codes are available. Surprisingly enough, they’re different. When writing this article (April 2024), 25% off was the best one I found: Dexxter via YoungOnes – Dexxter
Dexxter is slightly cheaper than the “small” package from Accountable.
Conclusion
TLDR: Choose Dexxter!
In both cases, it’s a shame they do not have an API at this point. This is a huge disappointment. If either one of them would have had this feature, it would most definitely have made the difference.
Both Accountable and Dexxter look very modern. Accountable has a cleaner lay-out (which I prefer), but feels slightly less snappy – however, it doesn’t feel sluggish at all.
With Accountable, I couldn’t choose the start date of my investment; despite a KB article mentioning it could be changed after contacting support (who put me on the wrong track first).
What makes Accountable the better choice?
Accountable somehow managed to alert me better about my requirement to submit an IC listing of my European customers.
They also allow you to export all your data.
Their suggestions to categorize costs, are more intelligent-guess based in combination with wizards.
What makes Dexxter the better choice?
I really miss product management in Accountable. It’s easy to re-select items when creating invoices.
The Mollie integration is something I keep in mind for the future. As I have many international customers, Mollie would allow them to pay through a vast majority of services (of course, Mollie is an extra cost). It’s also a payment solution I have considered in the past for a webshop.
Just a personal preference: pro rata write off (investment).
It’s possible to require Kerberos authentication before allowing access to a web application, let’s say served by an Apache2 web server.
In practice, for one of my favorite web applications (iTop); it means internal domain users could be automatically authenticated. They would not need to provide their credentials and there’s no need to configure an external Identity Provider using SAML or OpenID.
I’ve initially first set it up for a WordPress plugin called “Next Active Directory integration”, to allow single-sign on to the WordPress. Later on, I also configured iTop to work this way.
Prerequisites
For this post, we make the following assumptions about the infrastructure:
There is an Active Directory in place in a typical Microsoft Windows enterprise environment.
There is an Apache2 web server – using a Debian-based operating system (I’m personally using Ubuntu). This webserver can connect to the primary domain controller of the Active Directory environment. This domain controller should allow inbound connections coming from the webserver on both UDP and TCP port 88.
Note that I try to follow best-practices and security standards which are in place when writing this post, in February 2024. If you come here after several years, the instructions or recommendations may be slightly different.
Reference
In this post, we’ll be using:
YOURDOMAIN.ORG
This is the Fully Qualified Domain Name (FQDN) of your Windows domain.
webserver.yourdomain.org
This is the name of your webserver. Note: We did not domain-join this webserver in any specific way.
krb5.webserver01
The user name of the Active Directory user account that will be used for the service.
DontJustCopyThis*1234
The password of the Active Directory user account that will be used for the service.
Active Directory configuration
Let’s prepare the Active Directory side. What we need here, is a regular user account. This user does not need to belong to any privileged groups. In fact, I recommend against it. Ideally, this should be a dedicated account.
Open Active Directory Users and Computers.
Create a new user. Give it a decent name ( e.g. krb5.webserver01 ) and secure password. In the rest of this post, we’ll be using krb5.webserver01 and DontJustCopyThis*1234 as password.
Set the password to never expire.
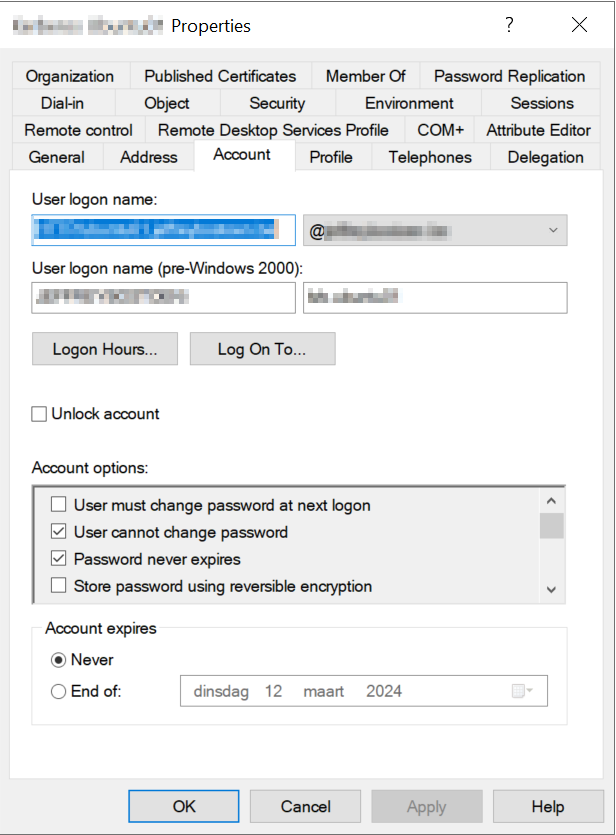
In the properties, under “Account”, check these boxes:
User cannot change password.
Password never expires.
This account supports Kerberos AES 256 bit encryption. (Scroll down a bit, it’s also in the list of Account options).
We’ll also need to generate a so-called keytab using the ktpass command. There are some variants of this instruction on the Internet, with some for example allowing all cryptography algorithms. I want to keep it as secure as possible, and explicitly want to restrict it to only support AES-256. This may lead to an additional challenge which gets covered below.
I suggest executing this in an elevated (Run as administrator) command prompt on a domain controller:
Q: What is a keytab file? A: A keytab is a file containing pairs of Kerberos principals and encrypted keys that are derived from the Kerberos password. You can use this file to log on to Kerberos without being prompted for a password.
Q: Can I use a “service account” for this? A: I looked into service accounts (introduced in Microsoft Windows Server 2016), but that was a dead end for me.
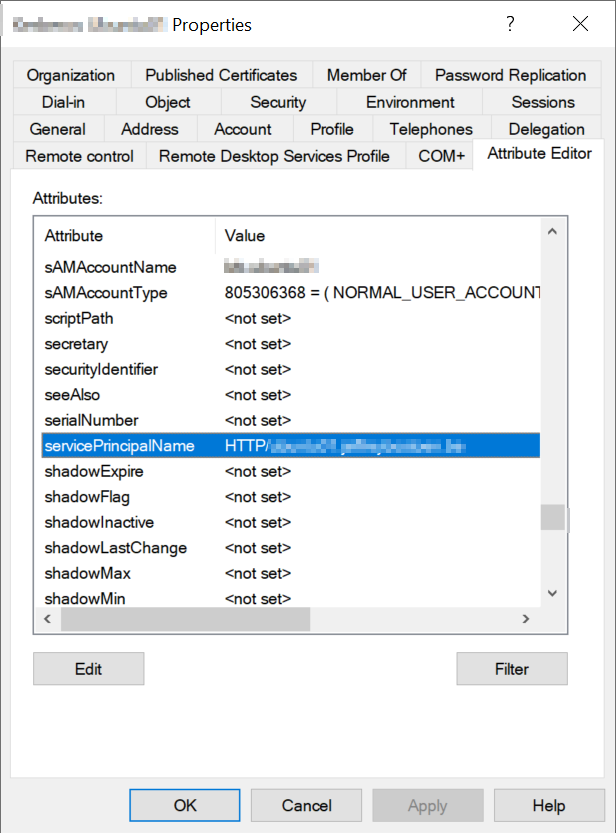
You can verify if the proper SPN (Service Principal Name) is set. In Active Directory Users and Computers, under View, make sure Advanced features is checked.
Then, when viewing the properties of the user account, you should see the HTTP/webserver.yourdomain.org@YOURDOMAIN.ORG value in the Attribute Editor tab for servicePrincipalName.
Kerberos configuration (webserver)
Time to configure the server.
apt install krb5-user
Now, take your favorite text editor to change the configuration file /etc/krb5.conf . Under the [realms] section, you’ll want to add your own Active Directory domain in uppercase.
[realms]
YOURDOMAIN.ORG = {

	# Specify at least one Kerberos Domain Controller (KDC).
	# Usually, your primary domain controller acts as a Kerberos Domain Controller.
	# If you want to specify additional KDCs, just enter one line like this for each KDC:
	kdc = 10.1.10.1

	# Admin server. In most setups, just point to the primary Domain Controller.
	admin_server = 10.1.10.1

	# AES256 made things a bit more tricky. To avoid trying deprecated cryptography such as RC4-HMAC and only use AES256:
	default_tkt_enctypes = aes256-cts-hmac-sha1-96 rc4-hmac
	default_tgs_enctypes = aes256-cts-hmac-sha1-96  rc4-hmac
	permitted_enctypes = aes256-cts-hmac-sha1-96 rc4-hmac
}
Let’s put this configuration to the test. On the Linux webserver, you can now try the command below. Note that this is NOT our krb5.webserver01 user; but just another regular user account!
kinit your-user@YOURDOMAIN.ORG
You won’t see much if everything goes right. If something goes wrong, you’d see an error message. For example:
kinit: Client ‘nonexistinguser@YOURDOMAIN.ORG’ not found in Kerberos database while getting initial credentials. – After entering an incorrect username.
kinit: Password incorrect while getting initial credentials. – After entering an incorrect password.
To truly validate, run:
klist
This should output info about the ticket cache such as the default principal, two timestamps to indicate during which period the ticket will be valid, and a service principal such as krbtgt/YOURDOMAIN.ORG@YOURDOMAIN.ORG .
Q: What is this krbtgt string? A: KRB = Kerberos, TGT = Ticket Granting Ticket. KRBTGT is a default account that exists in all Windows domains. It is meant to act as a service account (specifically for the KDC = Key Distribution Center) for domain controllers.
To clear the credentials, run:
kdestroy
Apache2 configuration (webserver)
We’ll assume you already have your Apache2 up and running; with SSL enabled.
We’ll be using this module: GitHub – gssapi/mod_auth_gssapi: GSSAPI Negotiate module for Apache . Let’s first get this concept working. I do recommend reading some of the documentation after we manage to pull this off, as it also contains some other options (I recommend reading up on GssapiUseSessions ).
Anyhow, we’ll need to install this module:
apt install libapache2-mod-auth-gssapi
Now, for the sake of my implementation, I personally had a virtual host configured on port 443. The server name (host header) was webserver.yourdomain.org .
I put these settings in my location block (I only had one):
<Location/>

	AuthType GSSAPI
	AuthName "Kerberos Authentication"

	# The keytab file that was generated before.
	GssapiCredStore keytab:/privkeytab/krb5.webserver01.keytab
	GssapiAllowedMech krb5
	GssapiBasicAuth Off

	# Play around with this setting as needed.
	# "On" means the remote user would be identified as "someuser", with "Off" it would be "someuser@YOURDOMAIN.ORG".
	GssapiLocalName Off

	# Users should not be able to transmit sensitive data over non-SSL/TLS connections.
	GssapiSSLonly On

	# Only accept users who are able to authenticate.
	require valid-user

</Location>
As you see, we need to transfer the krb5.webserver01.keytab file that we generated on the Windows domain controller to our Linux webserver.
In this example, I’ve transferred it to the /privkeytab folder. Now, make sure the user account linked to Apache 2.4 (often www-data) has permissions to use this:
chown -R www-data:www-data /privkeytab
Additionally, don’t forget to at least reload the Apache configuration. Although, if possible, I always perform a restart instead for this.
service apache2 restart && service apache2 status
Hint: If you have PHP installed, just make a simple PHP file which can echo our “remote user” variable later on. $_SERVER[‘REMOTE_USER’] is the variable where the web application will be able to grab the username from.
Finally, the browser configuration. It’s commonly referred to as SPNEGO (Simple and Protected GSSAPI Negotiation Mechanism).
Below I’ll describe the steps to enable it on an individual machines. If you’re a system administrator; consider using group policies to deploy these settings to all your domain users and machines.
If you want to perform a quick test, navigate to the PHP file you created earlier. You should NOT be prompted for authentication. You should be automatically signed in. Your username should automatically be shown.
Microsoft Edge and Google Chrome
Open good old iexplore.exe .
Go to Tools > Internet Options.
In the Security tab, select Local Intranet.
Click [Sites].
Add: https://webserver01.yourdomain.org (or https://*.yourdomain.org if you want to be more lenient ).
Close the window.
Click [Custom level…].
Scroll to the bottom, find User Authentication > Logon.
Select Automatic logon with current user name and password.
Save and close all.
Mozilla Firefox
In the address bar, type about:config and press [Enter].
In the filter/search field, enter negotiate.
Find the setting named network.negotiate-auth.trusted-uris.
Make sure it includes https://webserver01.yourdomain.org and save.
Restart Mozilla Firefox.
iTop configuration
As a bonus, I’ll show you how to configure iTop to accept these kind of logons. If you want additional security, you can still check my “pro” extensions and use the Multi-Factor Authentication.
We’ll be configuring “external” authentication.
Open the iTop configuration. We’ll need to update two settings.
'allowed_login_types' => '...',
This setting lists the allowed login modes, seperated by the pipe ( | ) character. “External” needs to be present here. By default, it’s added at the end, according to the “Configuration parameters” documentation. However, another page suggests to put it first:
In order to ensure that the external authentication is used first (preventing iTop from prompting the already authenticated user a second time), make sure that in the iTop configuration file, the order for allowed_login_types specifies “external” as the first login mode
Make sure in iTop you do have a User account created.
If you’re going to use short login names (“someuser”), set GssapiLocalName in the Apache configuration to “On”. Otherwise, with GssapiLocalName set to “Off”, your user accounts would be named “someuser@YOURDOMAIN.ORG” instead.
Some common issues
Often, posts don’t include how to troubleshoot. I’ll share some issues I’ve ran into myself, and some solutions. You may want to consider setting a specific error_log directive in the Apache configuration; so you can easily see the Kerberos-related issues
Incorrect service principal name
[Sun Feb 11 13:29:16.940771 2024] [auth_gssapi:error] [pid 5428:tid 139654099572288] [client 192.168.0.210:64532] GSS ERROR In Negotiate Auth: gss_accept_sec_context() failed: [Unspecified GSS failure. Minor code may provide more information (Request ticket server HTTP/webserver01.yourdomain.org@YOURDOMAIN.ORG not found in keytab (ticket kvno 1))]
Solution: Double-check whether the keytab actually does contain this entry.
Enctype issues
[Sun Feb 11 13:42:42.501763 2024] [auth_gssapi:error] [pid 5852:tid 139767178040896] [client 192.168.0.210:63466] GSS ERROR In Negotiate Auth: gss_accept_sec_context() failed: [Unspecified GSS failure. Minor code may provide more information (Request ticket server HTTP/webserver01.yourdomain.org@YOURDOMAIN.ORG kvno 4 found in keytab but not with enctype rc4-hmac)]
Solution: In krb5.conf, make sure to specify the encryption types. In the keytab, only AES256 was included; so /etc/krb5.conf had to be adjusted. Otherwise, it still tried to authenticate with the insecure RC4-HMAC.
Afterward, I also learned that I might have seen even more info when creating a trace file I could check after running this command:
Then, not only check the output of the above command, but also of the trace log /tmp/krb5_trace.log .
Ticket out of date
[Sun Feb 11 13:57:52.894981 2024] [auth_gssapi:error] [pid 6349:tid 140421321233984] [client 192.168.0.210:63692] GSS ERROR In Negotiate Auth: gss_accept_sec_context() failed: [Unspecified GSS failure. Minor code may provide more information (Request ticket server HTTP/webserver01.yourdomain.org@YOURDOMAIN.ORG kvno 4 not found in keytab; ticket is likely out of date)]
To be honest, this one was only resolved after I rebooted the machine I used to navigate to the web application. I think I just should have purged the cache there. Running klist purge on this Windows machine may have spared me from a reboot.
When running klist on Microsoft Windows, you’ll also get an overview of the cached tickets. You’ll see the same krbtgt/YOURDOMAIN.ORG@YOURDOMAIN.ORG ; and also a ticket where the server is listed as HTTP/webserver01.yourdomain.org@YOURDOMAIN.ORG . It also includes some extra info such as the validity period and session key type (encryption). It also lists the KDC (Kerberos Domain Controller) that was used.
SPNEGO cannot find mechanisms to negotiate
Sun Feb 11 14:41:02.838029 2024] [auth_gssapi:error] [pid 14397] [client 192.168.0.210:61579] GSS ERROR In Negotiate Auth: gss_accept_sec_context() failed: [Unspecified GSS failure. Minor code may provide more information ( SPNEGO cannot find mechanisms to negotiate)]
It means the SPNEGO authentication fails.
In my case, I was just messing around with settings in the Apache configuration that led to the error above.
No credentials were supplied, or the credentials were unavailable or inaccessible (Unknown error)
[Sun Feb 11 20:40:55.691852 2024] [auth_gssapi:error] [pid 4492] [client 192.168.0.210:57991] GSS ERROR In Negotiate Auth: gss_accept_sec_context() failed: [No credentials were supplied, or the credentials were unavailable or inaccessible (Unknown error)]
The above error occurred if I used Google Chrome to navigate to the web application, without it being in the list of local Intranet websites. It then shows a prompt instead to enter credentials. Trying do dismiss it and not entering credentials, leads to the above. However, when manually entering correct credentials; it won’t display this.
# Replace this with the variables found in the Duo Admin portal.
# These are generic settings.
integrationKey="xxx"
secretKey="xxx"
apiHostname="xxx.duosecurity.com"

# Endpoint specific.
method="GET"
apiPath="/auth/v2/check"
params="" # Just left this in here, in case parameters do need to be passed.

# Each request needs to be signed.
# On the web, there was a script which used \n for newlines.
# For some reason, it didn't work for me until I actually changed the template to what you see below.
# The template is used to generate a signature, and consists of five things:
# timestamp, method, API hostname, API path and parameters (if there are none, there must be a blank line.)
requestTemplate="$timestamp
$method
$apiHostname
$apiPath
$params"

timestamp=$(date -R)

signature=$(echo -n "$requestTemplate" | openssl sha1 -hmac "$integrationKey" | cut -d" " -f 2)
authHeader=$(echo -n "$integrationKey:$signature" | base64 -w0)

# Some HTTP headers must be set.
curl -s -H "Date: $timestamp" -H "Content-Type: application/x-www-form-urlencoded" -H "Authorization: Basic $authHeader" https://$apiHostname$apiPath
Eventually, it worked and provided me with the output I needed.
Now, to know whether a user is authorized to log in, and (if so) returns the user’s available authentication factors, I wanted to check the /preauth endpoint. The script had to be adjusted a little bit; mainly in the cURL line. We specifically add the method in there (POST); and of course some data needed to be posted (params).
I struggled a while before realizing in this case I should NOT set the Content-Type: application/x-www-form-urlencoded header.
# Replace this with the variables found in the Duo Admin portal.
# These are generic settings.
integrationKey="xxx"
secretKey="xxx"
apiHostname="xxx.duosecurity.com"

# Endpoint specific.
method="GET"
apiPath="/auth/v2/preauth"
params="username=xxx" # Alternative for this endpoint: user_id=xxx where xxx is a Duo user ID.

# Each request needs to be signed.
# On the web, there was a script which used \n for newlines.
# For some reason, it didn't work for me until I actually changed the template to what you see below.
# The template is used to generate a signature, and consists of five things:
# timestamp, method, API hostname, API path and parameters (if there are none, there must be a blank line.)
requestTemplate="$timestamp
$method
$apiHostname
$apiPath
$params"

timestamp=$(date -R)

signature=$(echo -n "$requestTemplate" | openssl sha1 -hmac "$integrationKey" | cut -d" " -f 2)
authHeader=$(echo -n "$integrationKey:$signature" | base64 -w0)

# Some HTTP headers must be set.
curl -s -d "$params" -H "Date: $timestamp" -H "Authorization: Basic $authHeader" -X "$method" https://$apiHostname$apiPath
Since I only wanted to check those two things, I didn’t go through the effort of creating a function for this instead.
Keycloak is a versatile open source identity and access management solution. You’ll see that it is often used as an external Identity Provider (IdP).
You can put Keycloak in front of your web application (for example iTop, Awingu / Parallels Secure Workspace, …), and users would authenticate to it. Once authenticated to this (most commonly shared with other applications) identity provider; you’d be redirected to your web application where you’re then signed in.
You can put it in front of another identity provider, as I’ve documented for my employer Alludo ( Integrating a third-party identity provider in front of Microsoft ADFS with Parallels Secure Workspace ). In that scenario, I used KeyCloak as a stand-in for an external Identity Provider where users would authenticate using their national identity cards. Then, the Microsoft Active Directory Federation Services (ADFS) would transform this (hash of a) national number into the user principle name (UPN) of a Microsoft Active Directory User.
You could also do it the other way around, and put for example Microsoft ADFS in front of KeyCloak.
Installation on a fresh Ubuntu Server 20.04 LTS
Let’s elevate first, so we can execute the entire installation with elevated rights.
sudo su -
Let’s make sure we have the latest info on available packages.
root@ubuntu01:~# apt-get update
Prerequisite
Check if Java is installed. The output should look like this:
# Check Java version.
root@ubuntu01:~# java -version
openjdk version "11.0.21" 2023-10-17
OpenJDK Runtime Environment (build 11.0.21+9-post-Ubuntu-0ubuntu122.04)
OpenJDK 64-Bit Server VM (build 11.0.21+9-post-Ubuntu-0ubuntu122.04, mixed mode, sharing)
If the above command didn’t output a version, it means Java may not be installed yet.
root@ubuntu01:~# apt-get install default-jdk -y
If the above command didn’t output a version, it means Java may not be installed yet. Try:
Installing Keycloak
Unfortunately, it’s not as straight-forward as just downloading a package. Check the latest available link at https://www.keycloak.org. We’ll download the distribution from there, to our own /opt folder.
root@ubuntu01:~# cd /opt
# Download the file.
root@ubuntu01:~# wget -O keycloak.tar.gz https://github.com/keycloak/keycloak/releases/download/23.0.4/keycloak-23.0.4.tar.gz

# Create directory /opt/keycloak.
root@ubuntu01:~# mkdir keycloak

# Unpack under /opt/keycloak.
# In this example, the .tar.gz actually contained a "keycloak-23.0.4" folder.
# The --strip-components makes sure to ignore this first (1) level.
root@ubuntu01:~# tar -xzvf keycloak.tar.gz keycloak --strip-components=1
# List the files and folders in /opt/keycloak.
# In this example, the directory will contain a subdirectory with the specific version:
# /opt/keycloak/
# It should show a LICENSE.TXT, README.MD, version.txt files; and some folders: bin, conf, lib, providers, themes.
root@ubuntu01:~# ls -l /opt/keycloak

# Cleanup
root@ubuntu01:~# rm keycloak.tar.gz
Securing Keycloak
It would be a bad idea security-wise to run Keycloak as a root user. As a good practice, we’ll create a dedicated group and user for Keycloak.
# Create a group first.
root@ubuntu01:/opt# groupadd keycloak
# Create a dedicated user account.
# This user account will be part of the group keycloak.
# Its home directory will be set to /opt/keycloak.
# There will be no shell for this user.
# Its username is keycloak.
root@ubuntu01:/opt# useradd -r -g keycloak -d /opt/keycloak -s /sbin/nologin keycloak
Additionally, let’s adjust the folder and file permissions.
# Our Keycloak user becomes the owner of the folder /opt/keycloak and everything in it (recursively).
root@ubuntu01:/opt# chown -R keycloak: keycloak
# Set permissions.
root@ubuntu01:/opt# chmod o+x /opt/keycloak/bin
Configuring Keycloak as a service
If you’re familiar with some of the more common packages such as Apache, krb5, OpenSSL, … You’ll know that most of the time, you find configuration files under the /etc directory for these services. For Keycloak, we need to create this ourselves.
Turns out, my installation was so bare minimum that I still needed to install vim. This can be a bit of a complex text editor though for newcomers to Linux. You could of course use any text editor of your choice, such as nano.
# Install vim.
root@ubuntu01:/opt# apt install vim
The basic goal is to create a service configuration file.
# Start editing using vim.
root@ubuntu01:/opt# vim /etc/systemd/system/keycloak.service
The file contents should look like this:
[Unit]
Description=The Keycloak Server
After=syslog.target network.target

# Hint: If Keycloak must be started before other services,
# specify it like this:
# Before=apache2.service

[Service]
User=keycloak
Group=keycloak
LimitNOFILE=102642
PIDFile=/run/keycloak/keycloak.pid
ExecStart=/opt/keycloak/bin/kc.sh start --optimized
StandardOutput=null

[Install]
WantedBy=multi-user.target
Just as you are following this tutorial, I was also following some pointers on the Internet. For older versions, it seems. For example, to create the service file above, it mentioned copying the configuration file from a directory which is no longer present in the Keycloak 23 package.
I also initially configured a legacy/deprecated directory for the PIDFile. Hence, in the output I’ve pasted below, you’ll see the warning about /var/run not being correct.
# Reload daemon.
root@ubuntu01:/opt/keycloak# systemctl daemon-reload

# Check Keycloak status. It will likely be shown as "inactive (dead)".
root@ubuntu01:/opt/keycloak# systemctl status keycloak
○ keycloak.service - The Keycloak Server
     Loaded: loaded (/etc/systemd/system/keycloak.service; disabled; vendor preset: enabled)
     Active: inactive (dead)

Jan 28 13:17:45 ubuntu01 systemd[1]: /etc/systemd/system/keycloak.service:13: PIDFile= references a path below legacy directory /var/run/, updating /var/run/keycloak/keycloak.pid → /run/keycloak/keycloak.pid; please update the unit file accordingly.

# Enable Keycloak.
root@ubuntu01:/opt/keycloak# systemctl enable keycloak

# Let's start the Keycloak service.
root@ubuntu01:/opt/keycloak# systemctl start keycloak

# And let's confirm the status after our start attempt.
root@ubuntu01:/opt/keycloak# systemctl status keycloak
× keycloak.service - The Keycloak Server
     Loaded: loaded (/etc/systemd/system/keycloak.service; enabled; vendor preset: enabled)
     Active: failed (Result: exit-code) since Sun 2024-01-28 13:19:44 UTC; 6s ago
    Process: 6427 ExecStart=/opt/keycloak/bin/kc.sh start --optimized (code=exited, status=1/FAILURE)
   Main PID: 6427 (code=exited, status=1/FAILURE)
        CPU: 522ms

Jan 28 13:19:43 ubuntu01 systemd[1]: Started The Keycloak Server.
Jan 28 13:19:44 ubuntu01 systemd[1]: keycloak.service: Main process exited, code=exited, status=1/FAILURE
Jan 28 13:19:44 ubuntu01 systemd[1]: keycloak.service: Failed with result 'exit-code'.
Well, that doesn’t look too good. I left it in here, as others may be running into the same issue. And to show that behind every post, there is often also initial failure as well. Let’s troubleshoot this by executing the action manually.
root@ubuntu01:/opt/keycloak# /opt/keycloak/bin/kc.sh start --optimized
Exception in thread "main" java.lang.UnsupportedClassVersionError: org/keycloak/quarkus/runtime/KeycloakMain has been compiled by a more recent version of the Java Runtime (class file version 61.0), this version of the Java Runtime only recognizes class file versions up to 55.0
	at java.base/java.lang.ClassLoader.defineClass1(Native Method)
	at java.base/java.lang.ClassLoader.defineClass(ClassLoader.java:1022)
	at io.quarkus.bootstrap.runner.RunnerClassLoader.loadClass(RunnerClassLoader.java:105)
	at io.quarkus.bootstrap.runner.RunnerClassLoader.loadClass(RunnerClassLoader.java:65)
	at io.quarkus.bootstrap.runner.QuarkusEntryPoint.doRun(QuarkusEntryPoint.java:60)
	at io.quarkus.bootstrap.runner.QuarkusEntryPoint.main(QuarkusEntryPoint.java:32)
Now this is more meaningful. We need a more up-to-date Java Runtime.
root@ubuntu01:/opt/keycloak# /opt/keycloak/bin/kc.sh start --optimized
ERROR: Unexpected error when starting the server in (production) mode
ERROR: Failed to start quarkus
ERROR: Strict hostname resolution configured but no hostname setting provided
For more details run the same command passing the '--verbose' option. Also you can use '--help' to see the details about the usage of the particular command.
See what it tells us.
root@ubuntu01:/opt/keycloak# /opt/keycloak/bin/kc.sh start --help
Start the server.

Usage:

kc.sh start [OPTIONS]

Use this command to run the server in production.

Options:

-h, --help           This help message.
--help-all           This same help message but with additional options.
--import-realm       Import realms during startup by reading any realm configuration file from the
                       'data/import' directory.
--optimized          Use this option to achieve an optimal startup time if you have previously
                       built a server image using the 'build' command.

Cache:

--cache <type>       Defines the cache mechanism for high-availability. By default in production
                       mode, a 'ispn' cache is used to create a cluster between multiple server
                       nodes. By default in development mode, a 'local' cache disables clustering
                       and is intended for development and testing purposes. Possible values are:
                       ispn, local. Default: ispn.
--cache-config-file <file>
                     Defines the file from which cache configuration should be loaded from. The
                       configuration file is relative to the 'conf/' directory.
--cache-stack <stack>
                     Define the default stack to use for cluster communication and node discovery.
                       This option only takes effect if 'cache' is set to 'ispn'. Default: udp.
                       Possible values are: tcp, udp, kubernetes, ec2, azure, google.

Database:

--db <vendor>        The database vendor. Possible values are: dev-file, dev-mem, mariadb, mssql,
                       mysql, oracle, postgres. Default: dev-file.
--db-driver <driver> The fully qualified class name of the JDBC driver. If not set, a default
                       driver is set accordingly to the chosen database.
--db-password <password>
                     The password of the database user.
--db-pool-initial-size <size>
                     The initial size of the connection pool.
--db-pool-max-size <size>
                     The maximum size of the connection pool. Default: 100.
--db-pool-min-size <size>
                     The minimal size of the connection pool.
--db-schema <schema> The database schema to be used.
--db-url <jdbc-url>  The full database JDBC URL. If not provided, a default URL is set based on the
                       selected database vendor. For instance, if using 'postgres', the default
                       JDBC URL would be 'jdbc:postgresql://localhost/keycloak'.
--db-url-database <dbname>
                     Sets the database name of the default JDBC URL of the chosen vendor. If the
                       `db-url` option is set, this option is ignored.
--db-url-host <hostname>
                     Sets the hostname of the default JDBC URL of the chosen vendor. If the
                       `db-url` option is set, this option is ignored.
--db-url-port <port> Sets the port of the default JDBC URL of the chosen vendor. If the `db-url`
                       option is set, this option is ignored.
--db-url-properties <properties>
                     Sets the properties of the default JDBC URL of the chosen vendor. Make sure to
                       set the properties accordingly to the format expected by the database
                       vendor, as well as appending the right character at the beginning of this
                       property value. If the `db-url` option is set, this option is ignored.
--db-username <username>
                     The username of the database user.

Transaction:

--transaction-xa-enabled <true|false>
                     If set to false, Keycloak uses a non-XA datasource in case the database does
                       not support XA transactions. Default: true.

Feature:

--features <feature> Enables a set of one or more features. Possible values are: account-api,
                       account2, account3, admin-api, admin-fine-grained-authz, admin2,
                       authorization, ciba, client-policies, client-secret-rotation,
                       declarative-user-profile, device-flow, docker, dpop, dynamic-scopes, fips,
                       impersonation, js-adapter, kerberos, linkedin-oauth, map-storage,
                       multi-site, par, preview, recovery-codes, scripts, step-up-authentication,
                       token-exchange, transient-users, update-email, web-authn.
--features-disabled <feature>
                     Disables a set of one or more features. Possible values are: account-api,
                       account2, account3, admin-api, admin-fine-grained-authz, admin2,
                       authorization, ciba, client-policies, client-secret-rotation,
                       declarative-user-profile, device-flow, docker, dpop, dynamic-scopes, fips,
                       impersonation, js-adapter, kerberos, linkedin-oauth, map-storage,
                       multi-site, par, preview, recovery-codes, scripts, step-up-authentication,
                       token-exchange, transient-users, update-email, web-authn.

Hostname:

--hostname <hostname>
                     Hostname for the Keycloak server.
--hostname-admin <hostname>
                     The hostname for accessing the administration console. Use this option if you
                       are exposing the administration console using a hostname other than the
                       value set to the 'hostname' option.
--hostname-admin-url <url>
                     Set the base URL for accessing the administration console, including scheme,
                       host, port and path
--hostname-debug <true|false>
                     Toggle the hostname debug page that is accessible at
                       /realms/master/hostname-debug Default: false.
--hostname-path <path>
                     This should be set if proxy uses a different context-path for Keycloak.
--hostname-port <port>
                     The port used by the proxy when exposing the hostname. Set this option if the
                       proxy uses a port other than the default HTTP and HTTPS ports. Default: -1.
--hostname-strict <true|false>
                     Disables dynamically resolving the hostname from request headers. Should
                       always be set to true in production, unless proxy verifies the Host header.
                       Default: true.
--hostname-strict-backchannel <true|false>
                     By default backchannel URLs are dynamically resolved from request headers to
                       allow internal and external applications. If all applications use the public
                       URL this option should be enabled. Default: false.
--hostname-url <url> Set the base URL for frontend URLs, including scheme, host, port and path.

HTTP/TLS:

--http-enabled <true|false>
                     Enables the HTTP listener. Default: false.
--http-host <host>   The used HTTP Host. Default: 0.0.0.0.
--http-max-queued-requests <requests>
                     Maximum number of queued HTTP requests. Use this to shed load in an overload
                       situation. Excess requests will return a "503 Server not Available" response.
--http-port <port>   The used HTTP port. Default: 8080.
--http-relative-path <path>
                     Set the path relative to '/' for serving resources. The path must start with a
                       '/'. Default: /.
--https-certificate-file <file>
                     The file path to a server certificate or certificate chain in PEM format.
--https-certificate-key-file <file>
                     The file path to a private key in PEM format.
--https-cipher-suites <ciphers>
                     The cipher suites to use. If none is given, a reasonable default is selected.
--https-client-auth <auth>
                     Configures the server to require/request client authentication. Possible
                       values are: none, request, required. Default: none.
--https-key-store-file <file>
                     The key store which holds the certificate information instead of specifying
                       separate files.
--https-key-store-password <password>
                     The password of the key store file. Default: password.
--https-key-store-type <type>
                     The type of the key store file. If not given, the type is automatically
                       detected based on the file name. If 'fips-mode' is set to 'strict' and no
                       value is set, it defaults to 'BCFKS'.
--https-port <port>  The used HTTPS port. Default: 8443.
--https-protocols <protocols>
                     The list of protocols to explicitly enable. Default: TLSv1.3,TLSv1.2.
--https-trust-store-file <file>
                     The trust store which holds the certificate information of the certificates to
                       trust.
--https-trust-store-password <password>
                     The password of the trust store file.
--https-trust-store-type <type>
                     The type of the trust store file. If not given, the type is automatically
                       detected based on the file name. If 'fips-mode' is set to 'strict' and no
                       value is set, it defaults to 'BCFKS'.

Health:

--health-enabled <true|false>
                     If the server should expose health check endpoints. If enabled, health checks
                       are available at the '/health', '/health/ready' and '/health/live'
                       endpoints. Default: false.

Config:

--config-keystore <config-keystore>
                     Specifies a path to the KeyStore Configuration Source.
--config-keystore-password <config-keystore-password>
                     Specifies a password to the KeyStore Configuration Source.
--config-keystore-type <config-keystore-type>
                     Specifies a type of the KeyStore Configuration Source. Default: PKCS12.

Metrics:

--metrics-enabled <true|false>
                     If the server should expose metrics. If enabled, metrics are available at the
                       '/metrics' endpoint. Default: false.

Proxy:

--proxy <mode>       The proxy address forwarding mode if the server is behind a reverse proxy.
                       Possible values are: none, edge, reencrypt, passthrough. Default: none.

Vault:

--vault <provider>   Enables a vault provider. Possible values are: file, keystore.
--vault-dir <dir>    If set, secrets can be obtained by reading the content of files within the
                       given directory.
--vault-file <file>  Path to the keystore file.
--vault-pass <pass>  Password for the vault keystore.
--vault-type <type>  Specifies the type of the keystore file. Default: PKCS12.

Logging:

--log <handler>      Enable one or more log handlers in a comma-separated list. Possible values
                       are: console, file, gelf. Default: console.
--log-console-color <true|false>
                     Enable or disable colors when logging to console. Default: false.
--log-console-format <format>
                     The format of unstructured console log entries. If the format has spaces in
                       it, escape the value using "<format>". Default: %d{yyyy-MM-dd HH:mm:ss,SSS} %
                       -5p [%c] (%t) %s%e%n.
--log-console-output <output>
                     Set the log output to JSON or default (plain) unstructured logging. Possible
                       values are: default, json. Default: default.
--log-file <file>    Set the log file path and filename. Default: data/log/keycloak.log.
--log-file-format <format>
                     Set a format specific to file log entries. Default: %d{yyyy-MM-dd HH:mm:ss,
                       SSS} %-5p [%c] (%t) %s%e%n.
--log-file-output <output>
                     Set the log output to JSON or default (plain) unstructured logging. Possible
                       values are: default, json. Default: default.
--log-gelf-facility <name>
                     The facility (name of the process) that sends the message. Default: keycloak.
--log-gelf-host <hostname>
                     Hostname of the Logstash or Graylog Host. By default UDP is used, prefix the
                       host with 'tcp:' to switch to TCP. Example: 'tcp:localhost' Default:
                       localhost.
--log-gelf-include-location <true|false>
                     Include source code location. Default: true.
--log-gelf-include-message-parameters <true|false>
                     Include message parameters from the log event. Default: true.
--log-gelf-include-stack-trace <true|false>
                     If set to true, occuring stack traces are included in the 'StackTrace' field
                       in the GELF output. Default: true.
--log-gelf-level <level>
                     The log level specifying which message levels will be logged by the GELF
                       logger. Message levels lower than this value will be discarded. Default:
                       INFO.
--log-gelf-max-message-size <size>
                     Maximum message size (in bytes). If the message size is exceeded, GELF will
                       submit the message in multiple chunks. Default: 8192.
--log-gelf-port <port>
                     The port the Logstash or Graylog Host is called on. Default: 12201.
--log-gelf-timestamp-format <pattern>
                     Set the format for the GELF timestamp field. Uses Java SimpleDateFormat
                       pattern. Default: yyyy-MM-dd HH:mm:ss,SSS.
--log-level <category:level>
                     The log level of the root category or a comma-separated list of individual
                       categories and their levels. For the root category, you don't need to
                       specify a category. Default: info.

Security:

--fips-mode <mode>   Sets the FIPS mode. If 'non-strict' is set, FIPS is enabled but on
                       non-approved mode. For full FIPS compliance, set 'strict' to run on approved
                       mode. This option defaults to 'disabled' when 'fips' feature is disabled,
                       which is by default. This option defaults to 'non-strict' when 'fips'
                       feature is enabled. Possible values are: non-strict, strict. Default:
                       disabled.

By default, this command tries to update the server configuration by running a
'build' before starting the server. You can disable this behavior by using the
'--optimized' option:

      $ kc.sh start '--optimized'

By doing that, the server should start faster based on any previous
configuration you have set when manually running the 'build' command.
Let’s try and specify a hostname.
root@ubuntu01:/opt/keycloak# /opt/keycloak/bin/kc.sh start --hostname=ubuntu01
2024-01-28 13:52:48,149 INFO  [org.keycloak.quarkus.runtime.hostname.DefaultHostnameProvider] (main) Hostname settings: Base URL: <unset>, Hostname: ubuntu01, Strict HTTPS: true, Path: <request>, Strict BackChannel: false, Admin URL: <unset>, Admin: <request>, Port: -1, Proxied: false
2024-01-28 13:52:50,414 WARN  [io.quarkus.agroal.runtime.DataSources] (main) Datasource <default> enables XA but transaction recovery is not enabled. Please enable transaction recovery by setting quarkus.transaction-manager.enable-recovery=true, otherwise data may be lost if the application is terminated abruptly
2024-01-28 13:52:51,729 WARN  [org.infinispan.PERSISTENCE] (keycloak-cache-init) ISPN000554: jboss-marshalling is deprecated and planned for removal
2024-01-28 13:52:52,070 INFO  [org.infinispan.CONTAINER] (keycloak-cache-init) ISPN000556: Starting user marshaller 'org.infinispan.jboss.marshalling.core.JBossUserMarshaller'
2024-01-28 13:52:52,328 INFO  [org.infinispan.CLUSTER] (keycloak-cache-init) ISPN000088: Unable to use any JGroups configuration mechanisms provided in properties {}. Using default JGroups configuration!
2024-01-28 13:52:52,670 INFO  [org.infinispan.CLUSTER] (keycloak-cache-init) ISPN000078: Starting JGroups channel `ISPN`
2024-01-28 13:52:52,673 INFO  [org.jgroups.JChannel] (keycloak-cache-init) local_addr: f84cf898-bda1-4458-a2b9-0afa365204b2, name: ubuntu01-33680
2024-01-28 13:52:52,679 WARN  [org.jgroups.protocols.UDP] (keycloak-cache-init) JGRP000015: the send buffer of socket MulticastSocket was set to 1MB, but the OS only allocated 212.99KB
2024-01-28 13:52:52,680 WARN  [org.jgroups.protocols.UDP] (keycloak-cache-init) JGRP000015: the receive buffer of socket MulticastSocket was set to 20MB, but the OS only allocated 212.99KB
2024-01-28 13:52:52,681 WARN  [org.jgroups.protocols.UDP] (keycloak-cache-init) JGRP000015: the send buffer of socket MulticastSocket was set to 1MB, but the OS only allocated 212.99KB
2024-01-28 13:52:52,683 WARN  [org.jgroups.protocols.UDP] (keycloak-cache-init) JGRP000015: the receive buffer of socket MulticastSocket was set to 25MB, but the OS only allocated 212.99KB
2024-01-28 13:52:52,718 INFO  [org.jgroups.protocols.FD_SOCK2] (keycloak-cache-init) server listening on *.23781
2024-01-28 13:52:54,730 INFO  [org.jgroups.protocols.pbcast.GMS] (keycloak-cache-init) ubuntu01-33680: no members discovered after 2007 ms: creating cluster as coordinator
2024-01-28 13:52:54,737 INFO  [org.infinispan.CLUSTER] (keycloak-cache-init) ISPN000094: Received new cluster view for channel ISPN: [ubuntu01-33680|0] (1) [ubuntu01-33680]
2024-01-28 13:52:54,743 INFO  [org.infinispan.CLUSTER] (keycloak-cache-init) ISPN000079: Channel `ISPN` local address is `ubuntu01-33680`, physical addresses are `[192.168.0.220:39317]`
2024-01-28 13:52:54,755 WARN  [org.infinispan.CONFIG] (keycloak-cache-init) ISPN000569: Unable to persist Infinispan internal caches as no global state enabled
2024-01-28 13:52:55,189 INFO  [org.infinispan.CLUSTER] (main) ISPN000080: Disconnecting JGroups channel `ISPN`
2024-01-28 13:52:55,284 ERROR [org.keycloak.quarkus.runtime.cli.ExecutionExceptionHandler] (main) ERROR: Failed to start server in (production) mode
2024-01-28 13:52:55,284 ERROR [org.keycloak.quarkus.runtime.cli.ExecutionExceptionHandler] (main) ERROR: Key material not provided to setup HTTPS. Please configure your keys/certificates or start the server in development mode.
2024-01-28 13:52:55,285 ERROR [org.keycloak.quarkus.runtime.cli.ExecutionExceptionHandler] (main) For more details run the same command passing the '--verbose' option. Also you can use '--help' to see the details about the usage of the particular command.
root@ubuntu01:/opt/keycloak# /opt/keycloak/bin/kc.sh start --hostname=ubuntu01
Another error. Yes, I’m indeed trying to launch Keycloak without using a certificate. It’s important to note here that I’m just quickly testing, and trying to get it up and running. Before going live with a production environment, of course this would need to be addressed properly.
Let’s try to run it again, this time with HTTP enabled.
root@ubuntu01:/opt/keycloak# /opt/keycloak/bin/kc.sh start --hostname=ubuntu01 --http-enabled=true
2024-01-28 13:57:17,080 INFO  [org.keycloak.quarkus.runtime.hostname.DefaultHostnameProvider] (main) Hostname settings: Base URL: <unset>, Hostname: ubuntu01, Strict HTTPS: true, Path: <request>, Strict BackChannel: false, Admin URL: <unset>, Admin: <request>, Port: -1, Proxied: false
2024-01-28 13:57:18,939 WARN  [io.quarkus.agroal.runtime.DataSources] (main) Datasource <default> enables XA but transaction recovery is not enabled. Please enable transaction recovery by setting quarkus.transaction-manager.enable-recovery=true, otherwise data may be lost if the application is terminated abruptly
2024-01-28 13:57:20,485 WARN  [org.infinispan.PERSISTENCE] (keycloak-cache-init) ISPN000554: jboss-marshalling is deprecated and planned for removal
2024-01-28 13:57:20,623 INFO  [org.infinispan.CONTAINER] (keycloak-cache-init) ISPN000556: Starting user marshaller 'org.infinispan.jboss.marshalling.core.JBossUserMarshaller'
2024-01-28 13:57:20,813 INFO  [org.infinispan.CLUSTER] (keycloak-cache-init) ISPN000088: Unable to use any JGroups configuration mechanisms provided in properties {}. Using default JGroups configuration!
2024-01-28 13:57:21,215 INFO  [org.infinispan.CLUSTER] (keycloak-cache-init) ISPN000078: Starting JGroups channel `ISPN`
2024-01-28 13:57:21,228 INFO  [org.jgroups.JChannel] (keycloak-cache-init) local_addr: 6e1ad1ef-2284-44ed-b58f-3f7dd14e9aa5, name: ubuntu01-34727
2024-01-28 13:57:21,241 WARN  [org.jgroups.protocols.UDP] (keycloak-cache-init) JGRP000015: the send buffer of socket MulticastSocket was set to 1MB, but the OS only allocated 212.99KB
2024-01-28 13:57:21,243 WARN  [org.jgroups.protocols.UDP] (keycloak-cache-init) JGRP000015: the receive buffer of socket MulticastSocket was set to 20MB, but the OS only allocated 212.99KB
2024-01-28 13:57:21,244 WARN  [org.jgroups.protocols.UDP] (keycloak-cache-init) JGRP000015: the send buffer of socket MulticastSocket was set to 1MB, but the OS only allocated 212.99KB
2024-01-28 13:57:21,244 WARN  [org.jgroups.protocols.UDP] (keycloak-cache-init) JGRP000015: the receive buffer of socket MulticastSocket was set to 25MB, but the OS only allocated 212.99KB
2024-01-28 13:57:21,264 INFO  [org.jgroups.protocols.FD_SOCK2] (keycloak-cache-init) server listening on *.32758
2024-01-28 13:57:23,288 INFO  [org.jgroups.protocols.pbcast.GMS] (keycloak-cache-init) ubuntu01-34727: no members discovered after 2004 ms: creating cluster as coordinator
2024-01-28 13:57:23,308 INFO  [org.infinispan.CLUSTER] (keycloak-cache-init) ISPN000094: Received new cluster view for channel ISPN: [ubuntu01-34727|0] (1) [ubuntu01-34727]
2024-01-28 13:57:23,333 INFO  [org.infinispan.CLUSTER] (keycloak-cache-init) ISPN000079: Channel `ISPN` local address is `ubuntu01-34727`, physical addresses are `[192.168.0.220:48294]`
2024-01-28 13:57:23,355 WARN  [org.infinispan.CONFIG] (keycloak-cache-init) ISPN000569: Unable to persist Infinispan internal caches as no global state enabled
2024-01-28 13:57:25,751 INFO  [org.keycloak.quarkus.runtime.storage.legacy.liquibase.QuarkusJpaUpdaterProvider] (main) Initializing database schema. Using changelog META-INF/jpa-changelog-master.xml

UPDATE SUMMARY
Run:                        117
Previously run:               0
Filtered out:                 0
-------------------------------
Total change sets:          117

2024-01-28 13:57:31,584 INFO  [org.keycloak.connections.infinispan.DefaultInfinispanConnectionProviderFactory] (main) Node name: ubuntu01-34727, Site name: null
2024-01-28 13:57:31,711 INFO  [org.keycloak.broker.provider.AbstractIdentityProviderMapper] (main) Registering class org.keycloak.broker.provider.mappersync.ConfigSyncEventListener
2024-01-28 13:57:31,788 INFO  [org.keycloak.services] (main) KC-SERVICES0050: Initializing master realm
2024-01-28 13:57:34,400 INFO  [io.quarkus] (main) Keycloak 23.0.4 on JVM (powered by Quarkus 3.2.9.Final) started in 19.120s. Listening on: http://0.0.0.0:8080
2024-01-28 13:57:34,401 INFO  [io.quarkus] (main) Profile prod activated.
2024-01-28 13:57:34,401 INFO  [io.quarkus] (main) Installed features: [agroal, cdi, hibernate-orm, jdbc-h2, jdbc-mariadb, jdbc-mssql, jdbc-mysql, jdbc-oracle, jdbc-postgresql, keycloak, logging-gelf, micrometer, narayana-jta, reactive-routes, resteasy-reactive, resteasy-reactive-jackson, smallrye-context-propagation, smallrye-health, vertx]
Alright, this seems to work! On this server, when navigating to http://127.0.0.1:8080/ , you should be able to see the Keycloak UI now.
Explaining how to get a proper SSL certificate (not a self-signed one) will lead us too far off topic. So for the purpose of this post, I did create a self-signed SSL certificate.
# Create directory to store the certificate and the key.
root@ubuntu01:/opt/keycloak# mkdir /opt/keycloak/certs
# Use openssl to generate a self-signed certificate.
root@ubuntu01:/opt/keycloak# openssl req -x509 -nodes -days 365 -newkey rsa:2048 -keyout mycert.key -out mycert.crt
Let’s try to run the Keycloak server with the self-signed certificate now. I’ve also specified the HTTPS port on which I expect Keycloak to listen: 8443.
Other lessons I learned: Make sure to create the log directory and set the permissions (in this case, change the owner to the keycloak user):
# Create log directory.
root@ubuntu01:/opt/keycloak# mkdir /var/log/keycloak
# Change the owner to the keycloak user (defined in the service configuration).
root@ubuntu01:/opt/keycloak# chown -R /var/log/keycloak
The reason it had crashed, turned out to be folder and file permissions. While configuring, I ran some commands as the root user (named “root”). As a result, under /opt/keycloak, the data and certs directories were both having the root user as an owner.
# Set owner of folder and files of the entire Keycloak directory again to the keycloak user.
root@ubuntu01:/opt/keycloak# chown -R keycloak: /opt/keycloak
Finally, it was up and running.
Bonus hint: for users, their account page (sign in) in Keycloak 23 will for example be: https://ubuntu01:8443/realms/iTop/account . So: https://{fqdn}/realms/{realmName}/account
Recently I installed an Ubuntu Server 20.04 LTS in a virtual machine on VM Workstation Player 17.
For some reason, while I did create a 20 GB disk, I quickly got a warning that my disk space was nearly full. Having used Ubuntu for a while, I was surprised to see my 20 GB would already be full on this fresh install.
So I verified using the commands below. As you can see, it did detect that my physical volume was slightly short of 20 GB.
root@ubuntu01:/opt# pvdisplay
  --- Physical volume ---
  PV Name               /dev/sda3
  VG Name               ubuntu-vg
  PV Size               <18.23 GiB / not usable 3.00 MiB
  Allocatable           yes
  PE Size               4.00 MiB
  Total PE              4665
  Free PE               2105
  Allocated PE          2560
  PV UUID               bsAlMw-TKc1-hMOx-8tdy-fjKR-NwW6-uMG5fg
But my volume group was a different story. The volume group size (VG Size) was close to what the output of the physical volume told us. However, only 10 GB was allocated; and 8.22 GiB was for some reason not allocated. Probably an oversight on my side.
root@ubuntu01:/opt# vgdisplay
  --- Volume group ---
  VG Name               ubuntu-vg
  System ID
  Format                lvm2
  Metadata Areas        1
  Metadata Sequence No  2
  VG Access             read/write
  VG Status             resizable
  MAX LV                0
  Cur LV                1
  Open LV               1
  Max PV                0
  Cur PV                1
  Act PV                1
  VG Size               18.22 GiB
  PE Size               4.00 MiB
  Total PE              4665
  Alloc PE / Size       2560 / 10.00 GiB
  Free  PE / Size       2105 / 8.22 GiB
  VG UUID               sYknqJ-0ZCm-9Cqc-qXp2-yU80-IC7N-eM75Jb
lvdisplay confirms this:
root@ubuntu01:/opt# lvdisplay
  --- Logical volume ---
  LV Path                /dev/ubuntu-vg/ubuntu-lv
  LV Name                ubuntu-lv
  VG Name                ubuntu-vg
  LV UUID                YAs7Vb-5luh-TBOs-IVOH-cxiT-s4zX-OhFinf
  LV Write Access        read/write
  LV Creation host, time ubuntu-server, 2024-01-28 08:44:17 +0000
  LV Status              available
  # open                 1
  LV Size                10.00 GiB
  Current LE             2560
  Segments               1
  Allocation             inherit
  Read ahead sectors     auto
  - currently set to     256
  Block device           253:0
Now, let’s make sure this logical volume group uses all the available space. Above, we see the LV Path, which is what we need to run our next command.
root@ubuntu01:/opt# lvextend -l +100%FREE /dev/ubuntu-vg/ubuntu-lv
  Size of logical volume ubuntu-vg/ubuntu-lv changed from 10.00 GiB (2560 extents) to 18.22 GiB (4665 extents).
  Logical volume ubuntu-vg/ubuntu-lv successfully resized.
If like me you forgot to add “-r” in the command above, check the type of file system.
A.I. (artificial intelligence) is the buzzword nowadays, especially in sales pitches. Expectations are high.
However, it’s crucial to keep in mind what A.I. means. A simple definition from Wikipedia: Artificial intelligence (AI) is the intelligence of machines or software, as opposed to the intelligence of humans or animals. 1
Now, when researching how A.I. can be leveraged in customer support, it often boils down to improving customer satisfaction or cost efficiency in various manners. In a traditional service desk tool, you’ll quickly notice most of the topics are not as complicated as you’d think.
A.I. is much more generic than the term machine learning. ( Wikipedia: Machine learning (ML) is a field of study in artificial intelligence concerned with the development and study of statistical algorithms that can learn from data and generalize to unseen data, and thus perform tasks without explicit instructions. ) 2 .
You’ll notice that a lot of ideas are actually still very much rule-based; rather than having some form of self-learning and self-improving neural network.
To put it very simple: With machine learning, the system learns and trains itself from historical data.
So what are the main ideas when it comes to A.I.? What’s currently possible? How can these tools lead to more satisfied customers? How can they assist support agents? Is there a risk (mostly first line) support agents will be replaced? What are the pitfalls? And, in our case, how does it apply to iTop?
Below you’ll find a summary of the most common concepts; their benefits; and their pitfalls.
Note that sometimes the goal is “reduce workload”. This is a very generic phrase. It could indeed mean that a business would need fewer people. It could also mean the staff has more opportunities to invest time in other facets of their job.
Smart suggestions and recommendations
What: Customers and staff could get recommendations on how to solve issues. They can be provided with a limited and accurate answer; to make sure they don’t need to go through an extensive admin manual or knowledge base.
Benefits:
For customers: Instant accurate answers.
For staff: Less work. Tickets will be deflected.
Goals:
Improve customer satisfaction.
Reduce work load.
Risks:
Low: Customer frustration.
Challenge:
The suggestions should be “smart”. The system should ideally only show recommendations which actually matter. For example, if a customer is specifically asking about product X, they should not be presented with knowledge base articles relating to product Y.
The list of suggestions should also be short and relevant. The suggestions should not lead to more confusion.
Smart suggestions could be offered in many ways:
Customers creating a ticket through a support portal, can be shown suggestions right away. This works for the classic creation of a ticket; but also with chatbots.
Customers creating a ticket through different channels, even e-mail, could receive these suggestions automatically at first.
Within the back-end of a service desk, recommendations could also be shown to the agent who handles the support case. From the recommendations, the agent can then select which ones truly matter for the customer.
What: A.I. can already do initial processing of a ticket. The urgency or complexity can be determined, categorization can already be performed (e.g. “software” or “hardware” issue), …
The most simple form is to do this rule-based. More advanced forms consist of machine learning, where the system learns for example how urgent a ticket really was.
After categorization, it can also assign the proper teams or agents.
Benefits:
For customers: Better response times.
For staff:
Less work.
Consistency. A system should also be more consistent in its categorization than different people doing the categorization.
What: A.I. can assign teams and agents to tickets. The system can route tickets to the best suited team or person. This could be done based on categorization (see above), but it could also factor in different factors such as work load, availability (holidays, schedules, time zone, …), expertise, spoken languages, other skills, …
The most simple form is to do this rule-based. More advanced forms consist of machine learning, where the system learns for example which agent handled similar cases in the most efficient manner.
Goals:
Improve customer satisfaction.
Reduce work load.
Benefits:
For customers: Better response times.
For staff: Better work load management.
Risks:
Low: Customer frustration (Ending up with the wrong team/agent. But those can still manually correctly re-assign it.)
The difference between a chatbot and a virtual assistant, is that a virtual assistant can perform more complex actions and try to offer a more personalized form of assistance. For convenience, I’m only using the term “chatbot” in this section.
What: Customers can chat with a system to get replies to their questions. During this flow, additional information can be automatically obtained already; and if needed, it can be passed on to a human who will take over the chat conversation or who will reach out later in an alternative manner.
Benefits:
For customers: Instant replies, 24/7. This is something smaller or local business usually can’t offer; as it requires working in shifts.
For staff:
Very basic questions get deflected.
Additional info can already be collected, such as for example log files, specific contact info, initial troubleshooting steps, …
Goals:
Improve customer satisfaction.
Reduce work load.
Risks:
High: Customer frustration.
Medium: Customer alienation. Depending on the services you offer, people appreciate two things: fast responses/solutions; and a personal experience – which becomes even more important when there is no quick fix.
Challenge: The chatbot must be mature enough to provide accurate replies. The system may face challenges in understanding what the customer means. It may fail to comprehend the context, the actual language, cultural nuances, …
Context is crucial when you want to provide customers a decent level of support. As a support agent, you might have a better grasp of what the customer struggled with in the past, what their environment looks like, what sensitivities there may be
Surely you’ve experienced this form of online chat, where you enter a question and the chatbot asks “did you mean X?” – which is not what you meant at all. An inadequate chatbot can already lead to more customer frustration. Customers may give up already and be very displeased. But most likely, they’ll end up with a (human) support agent. While their original issue might already have caused for some friction, their frustration might have become worse. This would lead to an immediate impact on the first interactions with the support agent who takes over at some point.
So the question could be: How many wrong guesses (if any) are acceptable?
Nowadays, depending on the type of customer service, customers may also be looking for a much more personalized experience.
Options in iTop: None natively available.
Language translation (machine translation)
What: We all know Google Translate or Deepl nowadays. This is only important for organizations who offer services to customers who speak different languages.
But A.I. could assist with language translation in both directions: the agent gets a translation from the customer’s inquiry; and the customer receives a translated version of the agent’s response.
Goals:
Improve customer satisfaction.
Benefits:
For customers and staff: They understand each other.
For customers: A more personalized experience.
Risks:
Medium: Customer frustration.
Medium: Staff frustration.
Challenge:
Translations may be incorrect. The more context there is, the better modern translation systems are. Imagine an organization which uses one service desk tool for all their departments. A ticket saying nothing more than “The window is stuck”: is this a computer issue; or is there actually a window in a building which can’t be opened?
Also, some parts should perhaps not be translated at all; or could be translated incorrectly. Imagine you are a vendor of software, and have localized versions of it for your end users. Will the translation algorithm used by the service desk provide the same output? If for example the agent sends a reply to a customer: Go to Settings > Federation; will it translate this as ‘Instellingen > Federatie’ or ‘Instellingen > Vereniging’ in Dutch (which may be different from what your localized software looks like).
Options in iTop: None natively available. If you’re interested in having this developed, please reach out.
Language suggestions
What: There are also systems available now which can adjust the tone of a message. The tone may depend a lot on the customer you’re writing to, or on the organization’s policy. Common techniques are rephrasing, elaborating, shortening, translating / synonyms, and grammar correction.
Do you want to send short bullet point responses to customers, or lengthy paragraphs? Are you going for an informal or formal style?
It will also help your agents (or systems) to send responses with less spelling or grammar mistakes.
Goals:
Improve customer experience.
Improve brand experience.
Benefits:
Offer a personalized experience to the customer (for instance: a lengthy formal reply vs. short informal reply).
Offer a unifiedbrand experience to the customer, where all communication sent by staff is in a unified tone.
Risks:
Low. Customer frustration. (Approached in the wrong personalized or brand style, but most people are quite easy-going here.).
Options in iTop: None natively available. If you’re interested in having this developed, please reach out.
Quick summary
What: The A.I. system summarizes the entire conversation and actions which were taken.
Benefits:
For customers: Better response times.
For staff: Better overview.
Goals:
Improve customer satisfaction.
Reduce work load.
Risks:
Medium: Customer frustration.
Medium: Staff frustration.
Challenge:
The summary should be accurate. It should contain all the really relevant information. Agents will be frustrated if crucial info is missing in this summary (as the goal of a summary is to avoid needing to go through an entire history). Customers will become frustrated if agents ask for information again which they already provided, but wasn’t part of the summary.
Options in iTop: None natively available. If you’re interested in having this developed, please reach out.
Predictive analysis
What: A.I. can identify common issues. We already discussed how it could also offer suggestions. This reduces the need for manual intervention. It can also help customers solve potential issues before there’s any form of escalation.
In some situations, it may also be possible to use historical data to predict when there will be more new cases. As a human, we may have some experience (new software releases, holiday periods, knowing which regions your customers are mostly situated in, …). A.I. can be a tool to support this; or to make predictions based on some event or pattern that you didn’t even consider yet.
Benefits:
For customers: Less resources lost with issues.
For staff: Better planning.
Goals:
Improve customer satisfaction.
Reduce work load.
Risks:
Low: Customer frustration.
Low: Staff frustration.
Options in iTop: None natively available. If you’re interested in having this developed, please reach out.
What is available though, is the Report Generator . Reports can be created from historical data, for example to see during which hours or in which months or on which days most cases were raised.
Sentiment analysis
What: The sentiment or emotional tone used by a customer, can be derived from their request. Based on indicators such as the use of certain words or phrases or emojis, it’s possible to determine whether a customer had a positive or negative feeling while writing certain responses.
Like the above, it could be a very simple mechanism; or it could be powered by a machine learning algorithm.
Goals:
Improve customer satisfaction.
Benefits:
For customers and staff: The customer experience can be influenced by this in many ways (see the challenge description below).
Risks:
High: Customer frustration.
High: Staff frustration.
Challenge:
Just like humans, also more advanced A.I. systems may struggle to correctly identify a sentiment. Especially when sarcasm is involved. For example, what if a simple system analyzed these sentences: “The customer support is really great 🙄”, “Thank you very much for wasting my time”. Or what if it does not consider the context, such as in “Your competitor had really terrible support compared to you guys”.
Assuming the agent A.I. system correctly identifies the sentiment, what actions will be taken?
Will a more personalized support be offered? And what does it mean? Will a human agent reach out, or will the A.I. system or employee adjust their tone?
Will the case be handled with priority? If so, you could stimulate customers to act upset to jump to the front of the line. This could lead to a lot of frustration within a support team, as the customer may keep up this act and be difficult to co-operate with for the agent. What if a really nice customer actually has an urgent issue going on but isn’t as pressing, while this one gets priority instead?
In my personal experience, this could be helpful information; but a real person should verify how relevant and accurate this analysis is. It’s best value is probably in following up relationships with customers outside of support cases.
Options in iTop: None natively available. If you’re interested in having this developed, please reach out.
In some scenarios, you want to generate a custom subCA certificate which can actually issue (smart card) certificates for users in a domain. It gets more complex however when the Certificate Authority is a Microsoft Windows Server which is not joined to the (same) Microsoft Windows domain.
You might see similar behavior:
While other export options are available, the option to export as Personal Information Exchange – PKCS #12 (.pfx) is greyed out. (Machine was not domain joined).
In the Certificate Manager in Microsoft Windows, there is no small “key” visible in the certificate’s icon.
The workaround is to create a .inf file for the certificate request. The instructions below were tested on a Microsoft Windows Server 2022 DataCenter at the time of writing.
The iTop Pro Extensions come with 1 year of maintenance and support included in the purchase price. You can then renew yearly at nearly 35% of the purchase cost.
The iTop Pro Complete Catalog is a yearly subscription which grants access to all iTop Pro extensions, but the price remains.




 I'm a native Dutch speaker, fluent in English.